AES Encryption
There are many encryption algorithms that can be used for secure cryptography, but we'll settle on AES (the Advanced Encryption Standard) in this tutorial. If you have your heart set on implementing something else, fear not: everything you'll learn here applies to other commonly-used symmetric block ciphers as well. The only real differences will be their internal implementations, and the range of key and block sizes that the ciphers accept.
AES is an open encryption standard set forth by the U.S. government in 2002 and is based on a set of ciphers called Rijndael. Due to its importance, transparency, and longevity, AES is widely used around the world and has received much scrutiny within the cryptographic community. If properly implemented, it is considered unbreakable by all currently known techniques.
All AES ciphers have a block size of 128 bits (16 bytes). A “block” is the string of plaintext data that is fed into the cipher, along with the key, for which a corresponding ciphertext block is returned. The three AES ciphers are AES-128, AES-192, and AES-256. The numbers indicate the key size that each cipher utilizes (16 bytes, 24 bytes, and 32 bytes respectively).
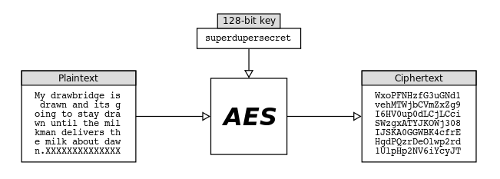
The illustration above is a simplified example of how AES works. To encrypt, the cipher takes two inputs: a key and plaintext. It uses the key to encrypt the plaintext and yields the resulting ciphertext. (For you purists out there, it should be noted that the ciphertext given in this illustration is only an example. It was not actually generated by AES. The ciphertext generated by AES is binary and cannot normally be printed in a readable fashion directly.)
As their name implies, block ciphers are designed to work on data in terms of discrete blocks. The AES block size is 128 bits (16 bytes), so programs which perform AES encryption feed plaintext (or ciphertext, for decryption) to the cipher in 16-byte chunks. We illustrate this in the above example by breaking the message and corresponding ciphertext into seven 16-byte lines.
You might have noticed that the last line in the plaintext is technically too short. The last block of the message consists of only two characters followed by what programmers call “padding” to fill out the remaining length of a fixed-size string. Block ciphers depend on their input being a specific known size; the algorithm won't work otherwise. To satisfy the requirement that every block be exactly 16 bytes in AES, we use the uppercase letter 'X' in this example. In many cases, this is sufficient. Anyone who decrypts this ciphertext and reads the resulting message will probably realize that the long string of 'X' isn't intended to be part of the message. But this doesn't necessarily work all the time, since there may be legitimate cases where the final character 'X' is an important part of the message. Fortunately, there is a much better solution to dealing with padding that we will discuss in the next article.
A Practical Example
As with any decent cryptographic system, AES is sufficiently complex that you wouldn't want to try whipping up your own implementation to use for important data unless you have a few years of hardcore crypto experience under your belt. (And probably not even then.) Fortunately, we're using Python, which has a number of quality cryptographic modules available. Since the standard C Python distribution doesn't come with modules for symmetric block ciphers, we'll use the Python Cryptography Toolkit, also known as PyCrypto.
PyCrypto can be fetched and built from pycrypto.org, but many Linux distributions carry it in their software repositories as well; look for and install the 'python-crypto' package on Debian, Ubuntu, and Fedora. There is no official Windows or OS X binary distribution of PyCrypto, but this article describes how to install Python and PyCrypto on Windows and OS X.
Once you have PyCrypto installed, we can start off with a simple example:
# Example 1

from Crypto.Cipher import AES

key = 'mysecretpassword'
plaintext = 'Secret Message A'

encobj = AES.new(key, AES.MODE_ECB)
ciphertext = encobj.encrypt(plaintext)

# Resulting ciphertext in hex
print ciphertext.encode('hex')
Example 1: Basic encryption
This script creates a ciphering object using a key and a feedback mode (ECB, which we'll discuss later). It then feeds the plaintext into that object with the encrypt() method which returns a ciphertext string. Since the resulting ciphertext is a binary string, we encode it in hex before printing it to the screen. When the script is run, it prints:
e8da47acc08bc751745ef8fbff44e107Not very interesting, is it? That's exactly the point. You can change the key and the plaintext (keeping in mind the key sizes and block size of AES) and note how the ciphertext comes out entirely different every time. You might have noticed that the length of hex-encoded ciphertext is 32 characters. By encoding it in hex, we've doubled the size because each binary character is represented by two hex characters, thus the actual ciphertext is only 16 characters. This is–not coincidentally–the block size of AES.
Let's see how the reverse operation works:
# Example 2

from Crypto.Cipher import AES
import binascii

key = 'mysecretpassword'
ciphertext = binascii.unhexlify('e8da47acc08bc751745ef8fbff44e107')

decobj = AES.new(key, AES.MODE_ECB)
plaintext = decobj.decrypt(ciphertext)

# Resulting plaintext
print plaintext
Example 2: Simple decryption
This script performs decryption on the ciphertext that was generated from the script in Example 1. The binascii module is used only to convert the hex representation of our ciphertext back into binary before it is fed into the decrypt() method of the ciphering object.
A Weakness Uncovered
Symmetric block ciphers, powerful though they are, have an inherent weakness.
When you encrypt a block of data, you typically do so with the expectation that eventually you'd like to retrieve that data again. Thus, the algorithm has to be deterministic. That is, for a given key and plaintext, a specific ciphertext will be generated each time. Which poses a problem: suppose you have blocks within the plaintext that are identical. This isn't terribly hard to imagine. A spreadsheet often has multiple cells containing the same data. An image almost always has multiple pixels of the same color value. If you encrypt files like these with a block cipher and do nothing else, an attacker could see a pattern in the ciphertext and use it to gain crucial insight into the nature of the plaintext. Take these two images for example:
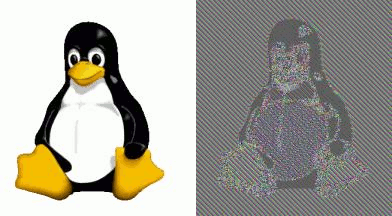
Illustration 2: Patterns in ciphertext
The plaintext image on the left is Tux, the Linux mascot. The image on the right is not actually an encrypted file, but is the result of running each pixel color value through a block cipher (with a key unknown to us). The image is then recreated with the encrypted color values. The image is technically encrypted with a strong cipher, but patterns in the plaintext data result in easily-discernible patterns in the ciphertext. This is a violation of the principle of non-uniformity we talked about in Section 1. Encrypting the data did little to hide the essence of the original file.
Here's a demonstration in code:
# Example 3

from Crypto.Cipher import AES

key = 'mysecretpassword'
plaintext1 = 'Secret Message A'
plaintext2 = 'Secret Message B'
plaintext3 = 'Secret Message C'
plaintext4 = 'Secret Message A'

encobj = AES.new(key, AES.MODE_ECB)
ciphertext1 = encobj.encrypt(plaintext1)
ciphertext2 = encobj.encrypt(plaintext2)
ciphertext3 = encobj.encrypt(plaintext3)
ciphertext4 = encobj.encrypt(plaintext4)

# Resulting ciphertext in hex
print ciphertext1.encode('hex')
print ciphertext2.encode('hex')
print ciphertext3.encode('hex')
print ciphertext4.encode('hex')
Example 3: Demonstrating the ECB mode of operation
This prints:
e8da47acc08bc751745ef8fbff44e107
49b1f4635c9a53c4f7538ba3b4452b32
0d750ffff1ab846b838a6a304860372e
e8da47acc08bc751745ef8fbff44e107
You can see that the ciphertext for plaintext1 and plaintext4 are identical. In real-world applications, ciphers are usually paired with a method to eliminate these redundancies in the resulting ciphertext. These methods are called modes of operation. In all of the examples so far, we used the Electronic Code Book (ECB) mode when creating the AES cipher object:
encobj = AES.new(key, AES.MODE_ECB)ECB is just the cryptographers' formal way of saying, “nothing has been done to eliminate obvious patterns in the ciphertext.” PyCrypto supports another mode of operation, Cipher Block Chaining (CBC). To eliminate redundancies in the resulting ciphertext, CBC incorporates the ciphertext of the previous block with that of the next so that the entire volume of ciphertext appears to be pseudo-random. When encrypting the first block, a random value called the initialization vector (IV) is XORed with the plaintext. The result is encrypted with the provided key. Before the second block is encrypted, its plaintext is XORed with the ciphertext of the previous block. And so it goes until all of the blocks in the file or message have been encrypted in this manner. Here's an illustration (the circled plus sign indicates the XOR operation):
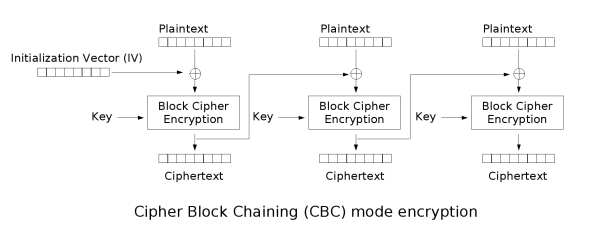
To use CBC in PyCrypto, all we have to do is supply an IV and change the mode:
# Example 4

from Crypto.Cipher import AES
import os

key = 'mysecretpassword'
iv = os.urandom(16)

# Output the initialization vector
print 'IV: ' + iv.encode('hex')

plaintext1 = 'Secret Message A'
plaintext2 = 'Secret Message B'
plaintext3 = 'Secret Message C'
plaintext4 = 'Secret Message A'

encobj = AES.new(key, AES.MODE_CBC, iv)
ciphertext1 = encobj.encrypt(plaintext1)
ciphertext2 = encobj.encrypt(plaintext2)
ciphertext3 = encobj.encrypt(plaintext3)
ciphertext4 = encobj.encrypt(plaintext4)

# Resulting ciphertext in hex
print 'A:  ' + ciphertext1.encode('hex')
print 'B:  ' + ciphertext2.encode('hex')
print 'C:  ' + ciphertext3.encode('hex')
print 'A:  ' + ciphertext4.encode('hex')
Example 4: Demonstrating the CBC mode of operation
If we run this example, we get something like:
IV: 1c531872a9b7a71bfc060b22c459136b
A:  ed7a68aa4a7c316047b6c6493b2d03d9
B:  5177729609a9bbd0500f8ea2614c7906
C:  46b19bace80917f655846aa697f201fb
A:  0e298e3b3072e8c595637d2e5feb16ec
The first thing to note here is that the ciphertext for message A no longer repeats. This is good! This keeps repeating plaintext blocks from forming patterns in the ciphertext. In fact, on every invocation of the script, all the ciphertext blocks change completely because a different IV is generated at random each time, even though the key and plaintext messages stay exactly the same.
You may have also noticed that we now have 5 blocks of ciphertext for 4 blocks of plaintext. The reason is simple: we added an extra block to the output by including an IV. The IV is generated at random and passed into the ciphering object. The IV has to be known at the time of decryption in order to produce the expected plaintext, so it is often prepended to the ciphertext. Knowledge of the IV itself cannot help an attacker break the encryption, so including it as generated poses no risk.
If you've understood everything presented so far, you should have a good idea as to what a decryption script for the above data looks like. If you're in the mood to do some homework, now is a great time to write one.
Check out Part 3 where we discuss keys and key strengthening techniques!
The image of Tux in Illustration 2 is copyrighted by Larry Ewing and was created with The GIMP.
8 comments:
Great article!
Just what I was looking for: a simple example with a thorough discussion and background.
Thanks!
These articles were great, thanks. Did you ever post part 3?
Thanks for your great article!
Marvelous examples!!
Looking forward for the next of this series
I'm curious why using the previous cipher works as a decoding Iv string:
decobj = AES.new(key, AES.MODE_CBC,ciphertext2)
print 'decryption: ' + decobj.decrypt(ciphertext3)
@Anonymous:
Excellent question. Take a look at the second illustration here, captioned "Cipher Block Chaining (CBC) mode decryption". On the first link of the chain, the IV is XORed with the output of the AES function to yield the plaintext of the first block. On each successive link, the ciphertext of the previous link is used instead. The code that you wrote simply bypassed the first two links in the chain.
Great article!
But I thought you said that the next part would explain how to deal with the padding of plaintext...but it didn't! :(
Or what exactly did you mean by "next article"?
Brando, you're absolutely right. I neglected to talk about padding in Part 3, and I've been procrastinating forever on writing Part 4. Padding can be done many ways, but I believe the method I was going to talk about is mentioned here: https://en.wikipedia.org/wiki/Block_cipher_mode_of_operation#Padding
To quote: "Slightly more complex is the original DES method, which is to add a single one bit, followed by enough zero bits to fill out the block; if the message ends on a block boundary, a whole padding block will be added."
Post a Comment